Thursday, February 28, 2013
A's New Room Sneak Peak No. 1
A. is finally into her long awaited room. We converted the sunroom into a very cute little room for her. She wanted a shabby chic room and since the room was basically being built from scratch we were able to add shabby chic elements into the room itself not just the decor.
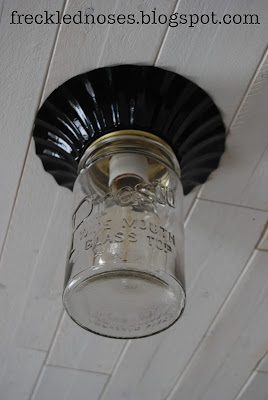
For the ceiling we did a tongue and groove pine and did one very thin coat of white paint on the rough sawn side and painted very sparsely so the wood grain would show and in spots the wood itself peaks out. For the light we used the existing fixture but in place of the old glass we used my favorite vintage mason jar. To complete the vintage look we used an old fashioned light bulb.
It is easily one of my most favorite things about her room. I am more than a little jealous since it is my favorite mason jar and she gets to look at it everytime she steps into her room.
I also worked on a secret project for her room. I did a pretty good job at actually keeping it a secret until 2 or 3 days before I was finished. Unfortunately when we were out shopping I let it slip that I was working on something for her. Oh boy did I get it. The entire rest of the day she bugged me about what it was and then started worrying that she wouldn't like it. I knew she would love it so I didn't have any stress over it. Plus if she didn't like it, I did, so I would just snag it for my room or the office area.
She spent the weekend with her besty so it gave me time to finish it up and place it in her room. I knew I didn't have to worry, when she got home Sunday she was instantly in love with it.
So here are the specifics. We were cleaning out in the basement and I found this stack of old windows and screens. I asked Cameron if they were earmarked for something and he said no. So after squealing with delight, I snagged this window and got to work. First task was to scrub all the dirt and grime off, then I sanded away. After I got it distressed to the point I was satisfied, I applied a coat of stain and sealer.
The top and third panel were taped off and a few coats of chalkboard paint were applied. Make sure you get the chalkboard paint that specifies it can be used on glass. Otherwise you end up with a big mess and no chalkboard. Yes, lesson learned. The second and third panel I stapled fabric to the window frame on the backside so it could be used as a wipe board.
Once everything was dry and in place I add these beautiful porcelain rose drawer pulls that I purchased from TJMaxx ages ago.
To hold the chalk and dry erase markers I took an old can and cleaned up any sharp edges and drilled a hold on each side of the can near the top to hold the ribbon to hang it. Then I took a scrap of fabric and mod-podged it to the can and added a piece of lace and ribbon. Once that dried a took a long piece of ribbon and threaded and knotted it to the can and hung it from one of those beautiful roses.
And so she would know what it was, before she got I home I modified a song I used to sing to her when she was little and wrote a verse on each pane.
I love how it turned out. And almost every day when I head into her room it has something new written on it. Notes to different family members, a list of crafts she has going on, homework she needs to finish, or just doodles. Love it!
Have any old windows laying around? Put them to work!!
Subscribe to:
Post Comments (Atom)


No comments:
Post a Comment